Unity3d game dev with Azure Mobile Services using BitRave plugin
Azure Mobile Service is now App Service, please follow the updated tutorial for App Services for Unity3d instead.
This quick-start tutorial is for Unity3d game developers who would like to get a cloud backend that runs across multiple platforms (including the Unity Editor for quick testing). One of the big advantages for game devs using Unity3d is that it supports so many platforms. It’s fair to say more people own more than one device that connects to the internet and a lot of them can run apps and games. While the platforms and ecosystems may differ as a gamer I would like to play the same game across any device (and on any platform) and expect things to sync. Azure Mobile Services is a ‘Backend as a Service’ which supports multi-platform app development. In Unity the BitRave plugin for Azure Mobile Services is designed to just work on any platform that Unity supports.
Watch getting started with Unity BitRave Azure plugin running on iOS and Android
-
To kick off with create a Mobile Service in Azure management portal. If you don’t have an Azure account yet game developers can register for the Cloud GameDev Offer.
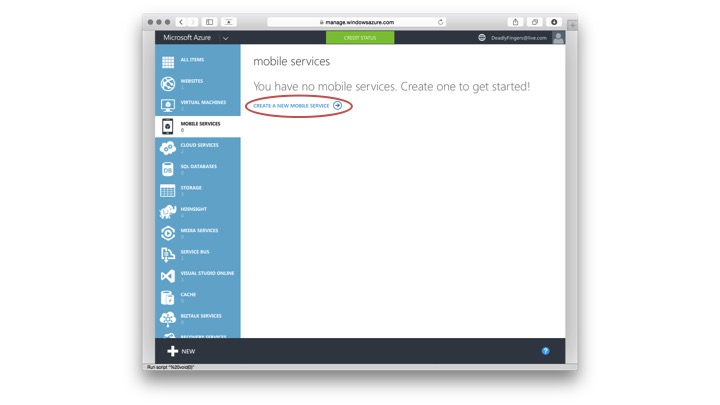
NB: A Mobile Service will only take a minute to setup and just a couple of minutes more to become active and ready to use.
-
Create new Unity3d project.

-
Copy BitRave’s AzureMobileServicesUniversalPlugin/Assets into Unity3d project’s ‘Assets’ folder.

-
Get JSON.NET Unity asset to enable cross platform support.

-
Open TestAzure Scene.

-
Open AzureUI.cs script and replace the connection strings with your own Mobile Service URL & API Key.

-
The BitRave demo uses Authentication with Facebook. You will need to create a Facebook app for your Mobile Service and copy & paste the App Id and App Secret into your Mobile Service’s IDENTITY Facebook section. Then generate the Facebook Access Token under Facebook’s Tools > Access Tokens.
 Copy the Access Token and paste into AzureUI.cs script’s Access Token value.

NB: Remember to save changes!
-
In Unity select the Main Camera and remove the Script in the Inspector panel.
 Reattach the AzureUI.cs script. (Drag & drop the script onto the Camera.)


-
Add the demo TodoItem table (in Azure Mobile Service’s get started section).

-
Run in Unity Editor and connect to Mobile Service.
 Once logged in you can add a TodoItem.
 You can query or list all items.
 Items can be selected to updated.

-
In Unity Build Settings switch platform to build for iOS. I’ve selected Development Build and Symlink Unity Libraries for smaller/faster builds.
 To run on the iOS Simulator edit Player Settings and under Target iOS Version menu select Simulator SDK

-
Open Xcode project to build & run. Rotate iOS simulator to landscape to display UI.
 Connect to Mobile Services by logging in to add some items.


-
In Unity Build Settings switch platform to build for Android. I’ve selected Development Build and Google Android Project.
 Edit Player Settings to change the Bundle Identifier. (This is in reverse domain name notation - for example net.deadlyfingers.DemoApp)

-
Import Android project into Android Studio.
 Edit the _AndroidManifest.xml* and change the installLocation attribute to auto.
 Build & run app. (I find the Nexus 7 tablet API 21 ARM emulator works best with Unity builds.)
 Rotate Android emulator to landscape to display UI.
 Connect to Mobile Services by logging in to add some items.


One more thing to todo!
You can also record the userId by adding one line of code on the server-side.
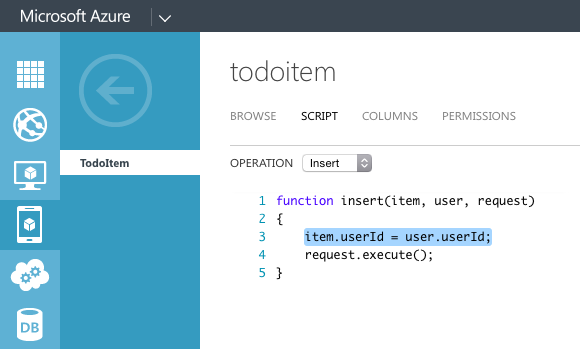
Edit TodoItem table Script > Insert
function insert(item, user, request) {
  item.userId = user.userId; // adds userId property to insert item from user object.
  request.execute();
}
Score bonus points!
Check out my Leaderboard BitRave tutorial showing how to save, update and query high scores stored in the Cloud using a Mobile Service.
Share your Unity3d #GameDev with @deadlyfingers