Ember-CLI ToDo example app with Azure Mobile Services
Background
When you create an Azure Mobile Service you can download a ToDo sample app to help you get started on a number of platforms including Windows, iOS and Android. There are also cross platform options available with Xamarin or web app development using PhoneGap or HTML/Javascript. Recently I came across a pretty neat Javascript framework called Ember for creating web apps. While you can go ahead and quickly download the Ember Starter Kit to try out some of the introductory snippets listed on the Emberjs homepage, the better option for serious development of Ember apps is to use Ember-CLI. The Ember Command Line Interface gets you up and running with a full MVC framework and helps install project dependencies using NPM (Node Package Manager) and Bower. Having just started learning Ember-CLI myself I thought it might be useful to do a getting started tutorial showing how to hook it up with Azure Mobile Services to create a ToDo app with same functionality as the other offerings already available on the Mobile Services quick-start page.
Prerequisites
Before you can start using Ember-CLI you will need Node.js installed.
How to install Node.js on Windows
Alternatively you can manage multiple node versions using the latest nvm-setup Windows installer.
nvm install 0.12.0
nvm use 0.12.0
See nvm-windows for more commands.
How to install Node.js on Mac
If you’re using a Mac its better to install Node.js using NVM (Node Version Manager) rather than install as admin/sudo user. Run the following commands in Terminal:
git clone https://github.com/creationix/nvm.git ~/.nvm && cd ~/.nvm && git checkout `git describe --abbrev=0 --tags`
# Edit bash profile
nano ~/.bash_profile
export NVM_DIR="/Users/YOUR_USERNAME/.nvm"
[-s "$NVM_DIR/nvm.sh"] && . "$NVM_DIR/nvm.sh"
# Loads nvm source
~/.bash_profile
nvm install 0.12.0 nvm alias default v0.12.0
NB: In new Terminal sessions you may need to run nvm use default. If you want to you can add this to your bash profile to setup automatically.
nvm use default
Or for a specific node version:
nvm use v0.12.0
Once you have node installed you can check its working by getting the version:
node -v
npm -v
Installing Ember-CLI and bower
Install ember-cli, bower and phantomjs globally using the -g switch.
npm install -g ember-cli
npm install -g bower
npm install -g phantomjs
Creating the Todo example app using Ember-CLI and Azure Mobile Services
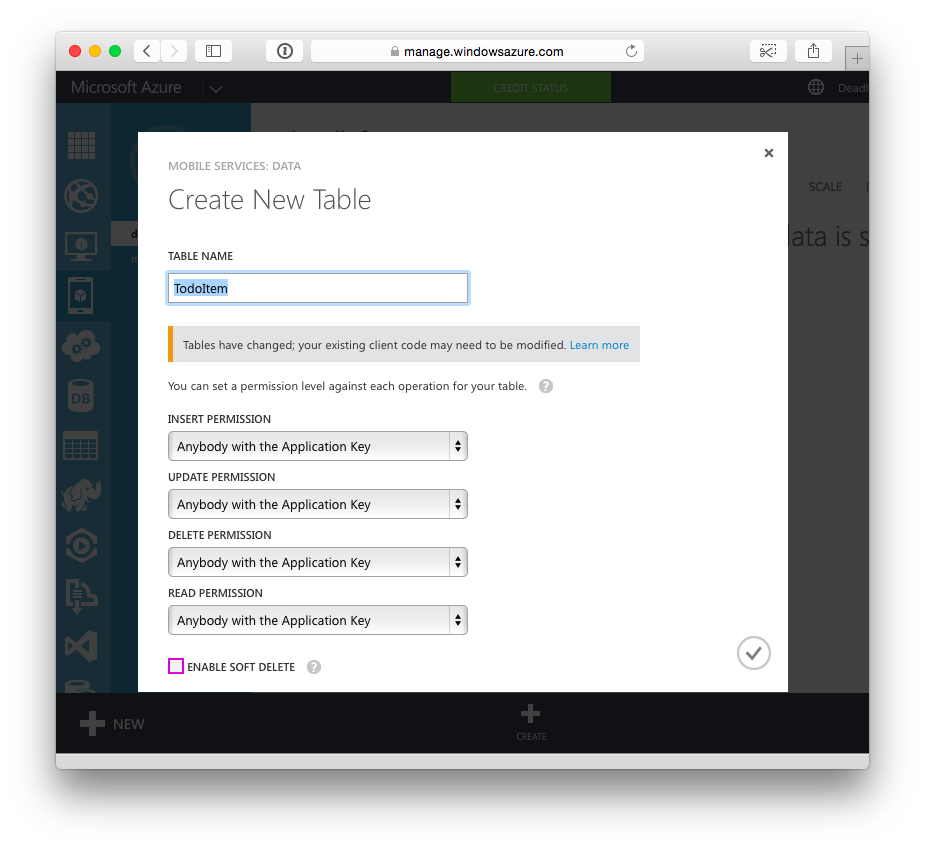
- Create an Azure Mobile Service
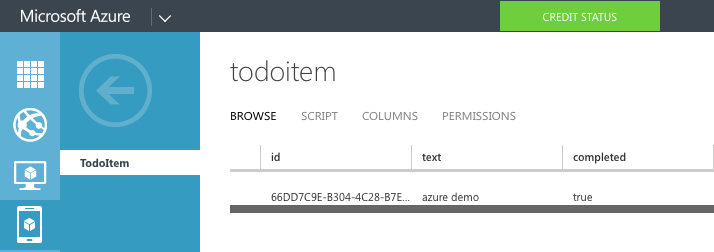
- Create example TodoItem table.
- Create a new Ember-CLI app
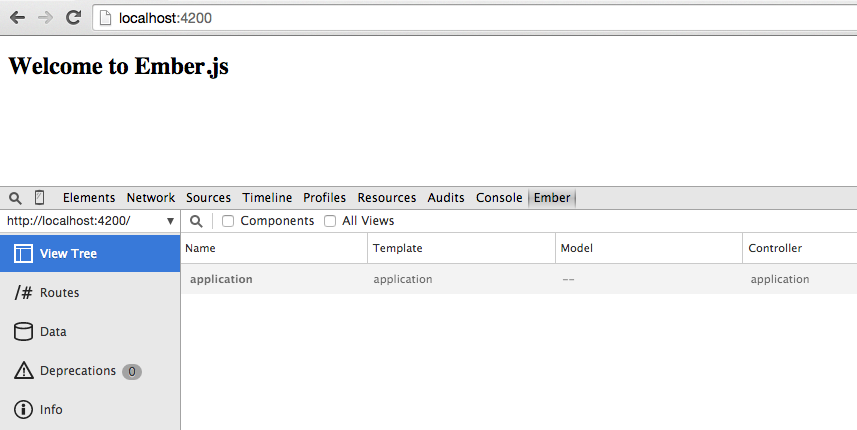
mkdir ~/TodoApp cd ~/TodoApp ember new client cd client - Run in ember client in Browser.
ember serve -
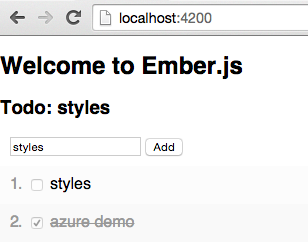
Open http://localhost:4200/ in new Browser window to see web app.
- Save Azure Mobile Services javascript files into
/vendorfolder. -
Update the Broccoli file
Brocfile.jsto import/vendorjavascriptsvar EmberApp = require('ember-cli/lib/broccoli/ember-app'); var app = new EmberApp(); app.import({ development: 'vendor/MobileServices.Web-1.2.5.js', production: 'vendor/MobileServices.Web-1.2.5.min.js' }); module.exports = app.toTree(); -
Update the js hint file
.jshintrcto recognise theWindowsAzureglobal namespace.{ "predef": [ "document", "window", "-Promise", "WindowsAzure" ], "browser": true, - Generate
TodoItemmodel,indexcontroller and route. (Generating a route will also generate a Handlebars index.hbs template by default).ember generate model TodoItem ember generate controller index ember generate route index - Create
azureservice. (Generating a service will also generate an azure-service.js initalizer)ember generate service azure -
Update the services/azure.js script with your own Mobile Service connection strings (on lines 61-62):
import Ember from 'ember';

var azureService = Ember.Object.extend({

  read : function(table){
    console.log(table + " read");
    return azureService.client().getTable(table).read().then(onComplete, onError);
    function onComplete(fulfilled){
      console.log("read items:" + fulfilled.length);
      return fulfilled;
    }
    function onError(error){
      console.log("Error reading item: " + error);
    }
  },

  insert : function(table, item, model){
    console.log(table + " insert:" + item.id + " model:" + model.length);
    return azureService.client().getTable(table).insert(item).then(onComplete, onError);
    function onComplete(fulfilledItem){
      // NB: use Ember's pushObject / unshiftObject to respect KVO!
      model.unshiftObject(fulfilledItem);
      console.log("inserted item:" + JSON.stringify(fulfilledItem) + " model:" + model.length);
      return fulfilledItem;
    }
    function onError(error){
      console.log("Error inserting item: "+error);
    }
  },

  del : function(table, item, model){
    console.log(table + " del:" + item.id + " model:" + model.length);
    return azureService.client().getTable(table).del(item).then(onComplete, onError);
    function onComplete(fulfilled){
      // NB: use Ember's removeObject to respect KVO!
      model.removeObject(item);
      console.log("deleted item:" + " model:" + model.length);
      return fulfilled;
    }
    function onError(error){
      console.log("Error deleting item: " + error);
    }
  },

  update : function(table, item){
    console.log(table + " update:" + item.id);
    return azureService.client().getTable(table).update(item).then(onComplete, onError);
    function onComplete(fulfilledItem){
      console.log("updated item:" + JSON.stringify(fulfilledItem));
      return fulfilledItem;
    }
    function onError(error){
      console.log("Error updating item: " + error);
    }
  }

});

//  creates static properties and methods for the class
azureService.reopenClass({
  APPLICATION_URL : "https://MOBILE_SERVICE_URL.azure-mobile.net/",
  APPLICATION_KEY : "",
  mobileServiceClient : null,

  client : function(){
    if(this.APPLICATION_URL === "" || this.APPLICATION_KEY === "") {
      var error = "Please configure your Azure Mobile Service URL & Application KEY (app/services/azure.js 61-62)";
      alert (error);
      throw ("\n" + error);
    } else {
      if (this.mobileServiceClient == null) {
        console.log("Creating Mobile Service Client...");
        this.mobileServiceClient = new WindowsAzure.MobileServiceClient(this.APPLICATION_URL, this.APPLICATION_KEY);
      }
      return this.mobileServiceClient;
    }
  }

});

export default azureService;
When the app first loads we will need to read a
table. In this case we will read the TodoItem table to get a list of TodoItems. When a user needs to add a Todo item we will call the insert method to add aniteminto atableand update our Embermodelfor display. Thedelmethod will work the same way except theitemwill be deleted. Finally theupdatemethod will be used to save changes to anitem, which in this case will be when the TodoItem is completed (stroked out). -
Edit models/todo-item.js to handle todo
textstring and acompletedboolean so tasks can be marked off:import DS from 'ember-data'; export default DS.Model.extend({ // NB: You may not set 'id' as an attribute on your model text: DS.attr('string'), completed: DS.attr('boolean') });The TodoItem model consists of a string property for the Todo text and a boolean property to say if the Todo item has been completed.
-
Edit routes/index.js and set
modelto read TodoItems table:import Ember from 'ember'; export default Ember.Route.extend({ model: function(){ var service = this.get('azureService'); var table = 'TodoItem'; console.log("service:" + service); return service.read(table); } });As
ember serveauto updates as you save changes you should see some activity in your Browser’s console log. -
In the Browser’s console log you might get a refused to connect error “because it violates the following Content Security Policy directive: connect-src ‘self’” that means we need to update our environment config. To fix this add the following
contentSecurityPolicysettings to theENVvar in config/environment.js to allow connections to*.azure-mobile.net:/* jshint node: true */ module.exports = function(environment) { var ENV = { modulePrefix: 'client', environment: environment, baseURL: '/', locationType: 'auto', EmberENV: { FEATURES: { // Here you can enable experimental features on an ember canary build // e.g. 'with-controller': true } }, contentSecurityPolicy: { 'default-src': "'none'", 'script-src': "'self' 'unsafe-inline' 'unsafe-eval' *.azure-mobile.net", 'font-src': "'self'", 'connect-src': "'self' *.azure-mobile.net", 'img-src': "'self'", 'style-src': "'self' 'unsafe-inline'", 'media-src': "'self'" }, APP: { // Here you can pass flags/options to your application instance // when it is created } }; -
Update the templates/index.hbs which will be used to display the user interface.
<h3> Todo: {{text}}</h3> <header> <form> {{input value=text type="text" name="text" placeholder="Todo" autofocus="autofocus"}} <input type="submit" value="Add" disabled> </form> </header><main> <ol> {{#each item in model}} </ol> <li> <label item> <input type="checkbox" disabled checked> <span class="item.completed">{{item.text}} <button item>Delete </button></span></label> </li> {{/each}} </main>NB: You will get an uncaught error if you try to add, update or delete items as we still need to handle user actions with a controller.
-
Update the controllers/index.js to handle actions from user interface and delegate them to our Azure service.
/* jshint node: true */ module.exports = function(environment) { var ENV = { modulePrefix: 'client', environment: environment, baseURL: '/', locationType: 'auto', EmberENV: { FEATURES: { // Here you can enable experimental features on an ember canary build // e.g. 'with-controller': true } }, contentSecurityPolicy: { 'default-src': "'none'", 'script-src': "'self' 'unsafe-inline' 'unsafe-eval' *.azure-mobile.net", 'font-src': "'self'", 'connect-src': "'self' *.azure-mobile.net", 'img-src': "'self'", 'style-src': "'self' 'unsafe-inline'", 'media-src': "'self'" }, APP: { // Here you can pass flags/options to your application instance // when it is created } };To allow access to the service from the controller we need to inject the
azureServicein the initializers/azure-service.js service initializer.export function initialize(container, application) { application.inject('route', 'azureService', 'service:azure'); application.inject('controller', 'azureService', 'service:azure'); } export default { name: 'azure-service', initialize: initialize };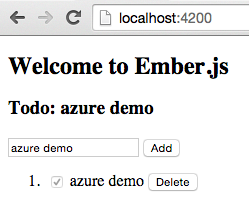
-
Finally add some styles to grey out and strike through completed items styles/app.css :
body {
  font-family: sans-serif;
  cursor: default;
  margin: 0;
  padding: 0;
  -webkit-user-select: none;
}

header {
  margin: 10px;
}

span {
  color: #000; /* default (incompleted todos) */
}

.completed, .true {
  color: #999; /* completed tasks are greyed and striked out */
  text-decoration: line-through;
}
button {
  float: right;
}

ol {
  list-style-position: inside;
  margin: 0;
  padding: 0;
  color: #999;
}

li {
  padding: 10px;
}

li:nth-child(odd) {
  background:#fcfcfc;
}

li:nth-child(even) {
  background:#f9f9f9;
}

label {
  cursor: pointer;
}
Download finished Todo ember-cli project on GitHub
git clone https://github.com/deadlyfingers/ember-cli-todo-app-azure.git
cd ember-cli-todo-app-azure
npm install
bower install
ember serve